I do however love to watch playthrough videos, so I can enjoy the storyline without being killed like, 5 times an hour.
So a few months back I finished watching the youtuber Cry's playthrough of Bioshock Infinite, I was completely hooked. I love the art, the story... basically everything. And this is one of the few games to reduce me to actual tears... ah but I won't spoil anything in case anyone reading this hasn't played (or in my case, watched) the game yet.
Anyway, I'm totally in love with Elizabeth in the game. Straight up there with Midna and Zelda on my list of favorite female characters! She's got personality, an amazing back story, and none of that whiny damsel in distress quality that annoys me to no end. Just recently, I've begun preparing my Elizabeth cosplay costume for a convention in Taipei in December!
How in the world can I not make an Elizabeth amigurumi with the amount of love I have for her? So, taking a break from my dear dwarfs, I went for it~ And as an added bonus, here's the free pattern =)

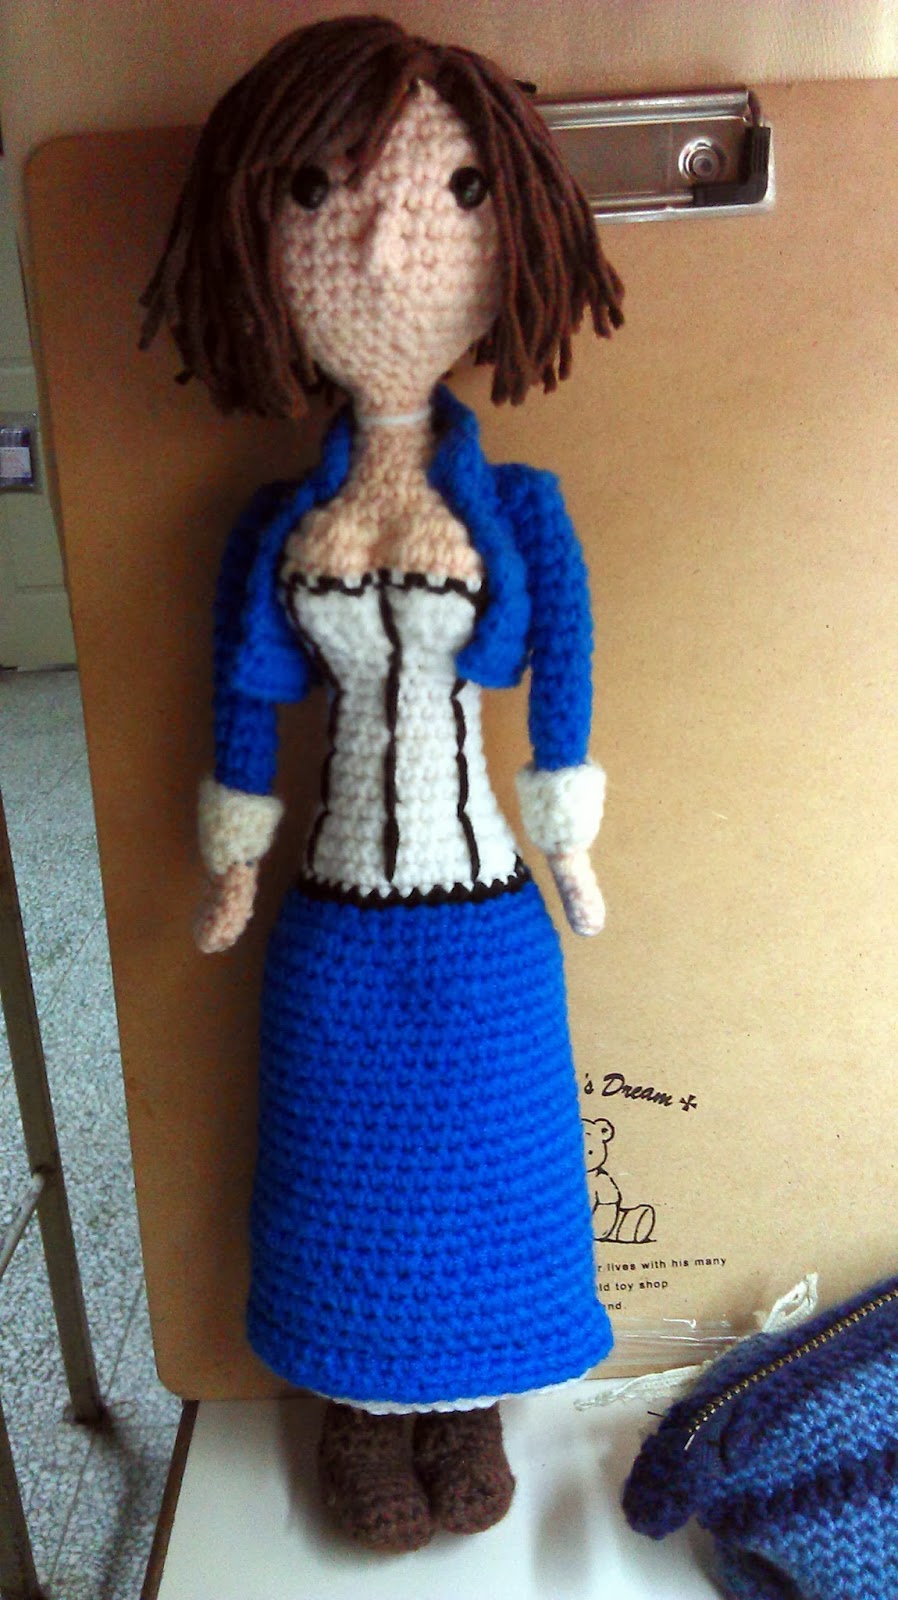
Okay, so here's the picture I used for reference. I used pretty much the same pattern for all my humanoid amigurumi's and Elizabeth is no different.
First, a photo spam~


Materials you'll need: yarn (blue, black, dsark brown, white, skin), 2.5mm (4/0) crochet hook, stuffing, 8mm eyes, yarn needle, stitch marker
Important!!!!!! Note: Parts of the pattern are incomplete. I redid some things while making this and didn't always note the changes down. Please go through the entire pattern before deciding whether to begin the project. Don't want people wasting good yarn.
.
Head and Body
*Stuff as you go along.*
Rnd1: With skin color, ch 5, sc in sec. ch from hook, sc in next 2 ch, 2sc in next ch. In back loops, sc in next 3 ch, 2sc in next ch. (10 sc)
Rnd 2: 2sc in next sc, sc in next 2 sc, 2sc in next sc, sc in next sc, 2sc in next sc, sc in next 2 sc, 2sc in next sc, sc in next sc. (14 sc)
Rnd 3: Sc in next sc, 2sc in next sc, sc in next 3 sc, 2sc in next sc, sc in next sc, 2sc in next sc, sc in next 4 sc, 2sc in next sc, sc in next sc (18 sc)
Rnd 4: Sc in next 3 sc, 2sc in next sc, sc in next 4 sc, 2sc in next sc, sc in next 3 sc, 2sc in next sc, sc in next 4 sc, 2sc in next sc. (22 sc)
Rnd 5&6: Keep increasing in each corner (increase 4 stitchs in each round) until stitch count is 30. (30sc)
Rnd 7: *sc in next 4 sc, 2sc in next sc* repeat to end. * (36 sc)
Rnd 8~11: sc all around (36 sc)
Rnd 12: sc in next 16 sc, sc2tog, *sc in next 4 sc, sc2tog* twice, sc in next 6 sc (33sc)
Rnd 13: repeat row 12 (30 sc)
Rnd 14: *sc in next 3 sc, sc2tog* 6 times (24sc)
It's a good idea to put in the eyes now. I put mine between rows 7 and 8, about 5 stitches apart.
Rnd 15: *sc in next 2 sc, sc2tog* 6 times (18sc)
Row 16: *sc in next 4 sc, sc2tog* 3 times (15sc)
Rnd 17: *sc in next 3 sc, sc2tog* 3 times (12sc)
Rnd 18: *sc in next sc, sc2tog* 4 times (8sc)
Rnd 19~21: sc all around (8sc)
Rnd 22: *sc in next sc, 2sc in next sc* (12sc)
Rnd 23: *sc in next 3 sc, 2sc in next sc* 3 times (15sc)
Rnd 24: *sc in next 4 sc, 2sc in next sc* 3 times (18sc)
Rnd 25: *sc in next 2 sc, 2sc in next sc* 6 times (24 sc)
Rnd 26: *sc in next 5 sc, 2 sc in next sc* 4 times (28sc)
Now, it's time to start on the breasts. Because you might have put the eyes in a slightly different place than mine, I'm just going to explain how the next round goes instead of giving specific stitch counts.
Rnd 27: First, you're going to figure out where the point between her breasts are going to be. Find the point between the eyes and trace down to find the center stitch. Mark it with a stitch marker (I don't have one handy so I improvised with a paperclip). Count 4 stitches on either side of the marked stitch. Sc until you reach the 4 stitches, then crochet the following: *2sc in next sc, 3sc in next 2 sc, 2 sc in next sc*. Sc on the marked stitch, then repeat from *to*. (40sc)
Rnd 28~29: sc all around (40sc)
Rnd 30: Switch to white, sc all around, but this time skip the center stitch. (39sc)


Rnd 31: Sc all around. (39sc)
Rnd 32: Count 10 stitches on each side of the center stitch. You will now be decreasing. Sc until you reach the 10 stitches, then crochet the following *sc in next sc, sc2tog four times, sc in next sc* twice. (31sc)
Rnd 33: Count 6 stitches on each side of the center stitch. Sc until you reach the 6 stitches, then crochet the following *sc in next sc, sc2tog twice, sc in next sc* twice. (27 sc)
Rnd 34: *Sc in next 7 sc, sc2tog in next sc* three times. (24 sc)
Rnd 35: * Sc in next 4 sc, sc2tog in next sc* 4 times. (20 sc)
Rnd 36~40: Sc all around. (20 sc)
Rnd 41: *Sc in next 4 sc, 2sc in next sc* 4 times. (24 sc)
Rnd 42: *Sc in next 7 sc, 2sc in next sc* 3 times. (27 sc)
Rnd 43: *sc in next 8 sc, 2sc in next sc* 3 times. (30 sc)
Rnd 44: sc all around (30sc)
Rnd 45: sc all around. (30 sc)
Rnd 46: in back loops only, *sc in next 8 sc, sc2tog* 3 times. (27sc)
Legs (continue from body)
Rnd 47~48: sc all around. (27sc)
Find the center stitches again (this time we'll need to note the one on the back as well), and mark them with stitch markers.

Rnd 49: sc to the marked stitch, ch 2, sc on second marked stitch, sc on the 2 ch towards the first marked stitch. Continue the round until you reach the second marked stitch.
You'll be working with legs separately from now on. For the second leg, sc along the back loops of the 2 ch made in round 49. Each leg should start with roughly 16 sts around, adjust by sc2tog or 2sc if necessary.
Legs (separate)
Rnd 1: sc all around (16sc)
Rnd 2: * sc in next 2 sc, sc2tog in next sc* 4 times (12sc)
Rnd 3~11: sc all around (12 sc)
Rnd 12: *sc in next sc, sc2tog* 4 times (8sc)
Rnd 13~21: sc all around (8sc)
Rnd 22: *sc in next 2 sc, sc2tog* twice (6sc)
Rnd 23: sc all round (6sc)
Skirt
Rnd 1: sc around the front loop of round 45 of the body. (30sc)
Rnd 2: *sc in next 4 sc, 2 sc in next sc* 6 times (36sc)
Rnd 3: *sc in next 5 sc, 2 sc in next sc* 6 times (42sc)
Rnd 4~23: sc all around (42sc)
Rnd 24: In front loops only, sc all around (42 sc)
Rnd 25: sc all around (42sc)
Rnd 26: In white, sc all around in back loops of rnd 23 (42sc)
Bolero (front, make two)
Row 1: ch 4, sc in 2nd ch from hook, sc through the row. (3 sc)
Row 2: ch to the end. (3 sc)
Row 3: ch in next 3 sc, 2sc in next sc (4 sc)
Row 4: ch to the end. (4 sc)
Row 5: ch in the next 4 sc, 2sc in next sc (5 sc)
Row 6~8: ch to the end (5 sc)
Row 9: ch in the next 5 sc, 2sc in the next sc (6 sc)
Row 10~12: ch to the end (6 sc)
Bolero (back)
Row 1: ch 13, sc in second ch from hook, sc to the end (12 sc)
Row 2: sc to the end. (12 sc)
Row 3: 2sc in first sc, sc to the last sc, 2sc in last sc. (14 sc)
Row 4~12: sc to the end. (14 sc)
Now sew the front pieces to the back to complete the Bolero, leaving a gap in the space where the arms would go.
Arms (make two)
Rnd 1: Make magic circle of 6 scs. (6 sc)
Rnd 2: *sc in next 2 sc, 2 sc in next sc* twice (8 sc)
Rnd 3~16: sc all around (8sc)
Rnd 17: *sc in next 2 sc, sc2tog in next sc* twice (6 sc)
Rnd 18: switch to white, sc all around (6 sc)
Rnd 19: *sc in next 2 sc, 2sc in next sc* twice (8sc)
Rnd 20: *sc in next 3 sc, 2sc in next sc* twice (10sc)
Rnd 21: sc all around (10 sc)
Fold white part up.
Hands (make two)
Rnd 1: ch 4, sc in 2nd ch from hook, sc in next ch, 2sc in next ch. In back loops, sc in next 2 sc, 2 sc in next sc (8 sc)
Rnd 2: *sc in next 3 sc, 2sc in next sc* twice (10 sc)
Rnd 3~4: sc all around (10 sc)
Rnd 5: *sc in next 3 sc, sc2tog in next sc* twice (8 sc)
Rnd 6: *sc in next 2 sc, sc2tog in next sc* twice (6 sc)
Sew to arms.
Boots (make two)
Rnd 1: ch 4, sc in 2nd ch from hook, sc in next ch, 2sc in next ch. In back loops, sc in next 2 sc, 2 sc in next sc (8 sc)
Rnd 2: 2 sc in next sc, sc in next 2 sc, 2sc in next 2 sc, sc in next 2 sc, 2sc in last sc (12 sc)
Rnd 3~4: sc all around (12 sc)
Now's the part I failed to take note of. Basically I did sc for the top of the boots (6 sc), then an hdc, then 4 dcs, and an hdc. I repeated this for around 3 more rows, sometimes decreasing where the hdc should be and increasing immediately after to make up for stitch count. I did a few more rows after that, to where I think the ankles might be, then sc around to the center point in the front of the boot, turn, sc around again to the center, turn, and continue as so for a few more rows.
Hair
Find where you want the hair to be parted. With dark brown (should be darker than what I used > <) knot 2 rows along that line, each parted a different way, and contine knotting rows under that. It's best to do just enough rows so that the scalp is not exposed. Too many rows can make the hair to poufy. I glue a layer of hair to the scalp so that she won't go bald every time someone holds her upside down.

Diagram of how I knotted the hair on. Red lines represent starting rows.
How I knot the hair on is in this post: http://crochetfangirl.blogspot.tw/2013/02/amigurumi-hair-tutorial-pigtails.html
I did a row and a half of scs in skin color on her face as the nose, I don't have it written down exactly what I did, but this is competely optional and not hard to figure out.
Now embroider the black lines onto the corset, and her necklace (I did mine in white), style her hair a bit, and voila!
My Elizabeth now stays happily with my friend (he'll probably want to stay unnamed XD), who refers to her as his daughter, and promises to take her to Paris one day 。◕‿◕。